
This guide walks you through testing in Infrahub using the pytest plugin. You'll learn to validate GraphQL queries, Jinja2 templates, and Transformations—all with easy-to-write YAML tests that require no Python coding.
We all write code, but how do we know the changes we make in the future won't break something that used to work? That’s where testing becomes important.
The idea is to catch problems early, ideally before they reach production. In the Python world, one of the most common ways to do this is with a tool called pytest. It lets you write tests to check that your code behaves the way you expect and helps you catch issues before they become a bigger problem.
When working with Infrahub, testing is just as important. You might want to make sure your GraphQL queries are valid, your Jinja2 templates render correctly, or your Transformations behave as expected.
Infrahub simplifies this by offering a pytest plugin that doesn’t require Python code; you define tests using plain YAML. This makes testing more accessible to teams across roles and speeds up the feedback loop during development.
These kinds of unit tests aren’t just about convenience, they help establish a production-ready automation system. With automated checks built into your process, every change is validated consistently, reducing the chance of something breaking unexpectedly. That consistency builds trust when your data behaves reliably, it’s easier for teams across your environment to work with confidence.
In this post, we’ll walk through how to use the Infrahub pytest plugin and cover the kinds of tests you can run, including syntax validation for GraphQL, Jinja2, and Transformation templates.
Quick recap
This post assumes you're already familiar with Infrahub and specifically with Jinja2 Transformations. That said, even if you're not fully familiar with them, you should still be able to follow along.
There are two YouTube videos that walk through the topics covered here in a video format:
- Building a Production-Grade Automation Platform With Infrahub - Part 1
- Building a Production-Grade Automation Platform With Infrahub - Part 2
And there’s a GitHub repository you can clone to try things out yourself.
In our previous post, we covered how to use Jinja2 with Infrahub by setting up a Transformation that takes data from Infrahub and renders it into plain text using a Jinja2 template. This process involves writing a GraphQL query to fetch the input data and passing it into the Jinja2 template. Everything is packaged into an .infrahub.yml file inside a Git repository, which Infrahub can then import and use.
In this post, we’ll solely focus on how to write tests using the pytest Infrahub plugin. The good news is, you don’t need to know pytest, and you won’t even need to write any Python code. So, let’s get to it.
Setting up the environment
Infrahub installation
Before we begin, of course, we need an Infrahub instance. The easiest way to get it up and running is by using Docker. You can do this by running the following:
curl https://infrahub.opsmill.io | docker compose -p infrahub -f - up -dThis command takes a few minutes to pull the necessary images and start the applications. Once everything is running, open your browser and go to http://:8000. Use the default credentials admin for the username and infrahub for the password to log in.
If you want to stop and remove the containers later, you can run:
docker compose -p infrahub downCloning and preparing the repository
Once you have Infrahub up and running and can log in, the next step is to clone a repository that contains the necessary schemas, sample data, Transformations, and tests.
This saves you the trouble of setting everything up from scratch. If you're trying this out in your environment with your data, you can skip this step. This is mainly for readers who want to follow along with the post using the provided sample data.
However, keep in mind that Infrahub needs full access to the Git repository you're working with. Since this is a public repository, you won't be able to add it directly to Infrahub with full permissions unless you fork it or copy it to a repository you control.
You have two options:
- Fork the repository on GitHub and use your fork’s URL when adding it to Infrahub. Just click the Fork button at the top right of the GitHub page and create a copy under your account.
- Clone the repo and point it to your own Git remote. To do this, run the following commands. This example uses GitLab, but the remote URL will differ depending on which Git provider you use, such as GitHub or Bitbucket. Be sure to update the URL accordingly.
git remote remove origin
git remote add origin [email protected]:yourname/infrahub-repo.git
git push -u origin --all
This will push the cloned content to your own Git repository, which you can then add to Infrahub. If your repository is private, you’ll also need to provide the necessary authentication credentials. We cover how to generate and use these credentials in detail in our documentation.
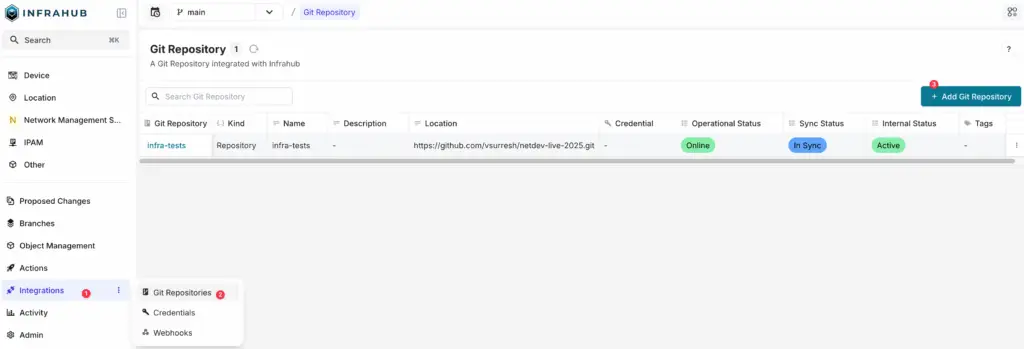
To add this repository to Infrahub (using either options), go to Integrations > Git Repositories and click on Add Git Repository. In the form, set the object type to Repository and enter the URL of your Git repository.
Now that we've added this to Infrahub, it's time to clone the repo locally if you haven't already done so. Once cloned, install the dependencies using uv.
uv add infrahub-sdk --extra alluv is a fast Python package manager that works as a drop-in replacement for pip and pip-tools. If you don't have uv installed, no problem. You can install the dependencies using pip instead.
pip install infrahub-sdk[all]After installing the dependencies, you can activate your virtual environment to start working with the SDK.
source .venv/bin/activateInfrahubctl
To use infrahubctl with our Infrahub instance, we first need to set up a few environment variables. This includes the API URL, username, and password. These variables let infrahubctl authenticate and communicate with the Infrahub API.
export INFRAHUB_USERNAME=admin
export INFRAHUB_PASSWORD=infrahub
export INFRAHUB_ADDRESS=http://localhost:8000
Once that's done, run the command infrahubctl info, and if everything is set up correctly, you should see a connection status with a green tick confirming that infrahubctl can connect to Infrahub.
Loading schema and data in Infrahub
Next, we’ll load the schema and data into Infrahub. The schema is already included in the repository you cloned earlier. To load it, run:
infrahubctl schema load schemas/Once the schema is loaded, you can begin adding data into Infrahub. The repository includes a few sample data files for this purpose. To load them, run the following commands:
infrahubctl object load data/sites.yml
infrahubctl object load data/groups.yml
infrahubctl object load data/devices.yml
infrahubctl object load data/servers.yml
You can also import everything with just one command.
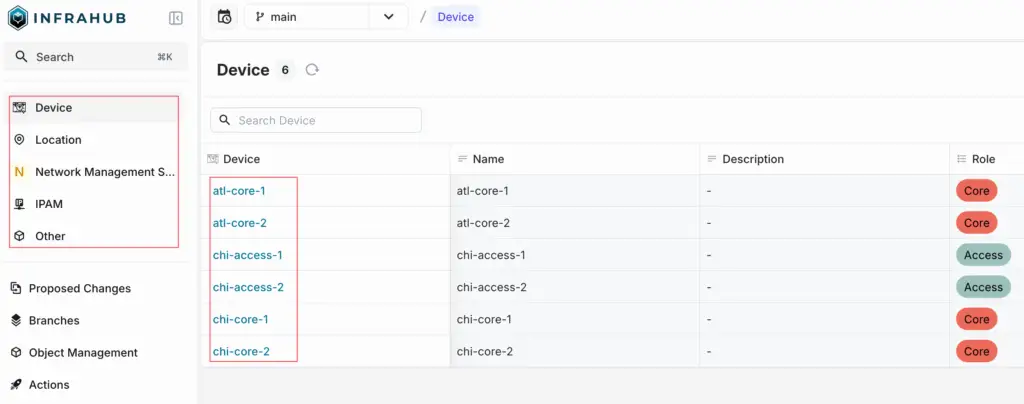
infrahubctl object load dataThis will populate Infrahub with a set of sites, groups, devices, and servers so you have some test data to work with as we move through the rest of the post.
Jinja2 Transformation
A Jinja2 Transformation in Infrahub is a way to take data stored in Infrahub and render it into a text output, like a device configuration. This is done using a Jinja2 template combined with a GraphQL query to fetch the input data. We're not covering this in detail here, just enough to understand the context for testing it.
In the example repository we’ve been using throughout this post, under the templates directory, you’ll find two key files. One is the GraphQL query (device_server.gql), and the other is the Jinja2 template (arista_ntp.tpl.j2).
query($device_name: String!) {
  InfraDevice(name__value: $device_name) {
    edges {
      node {
        name {
          value
        }
        location {
          node {
            name {
              value
            }
            servers {
              edges {
                node {
                  name {
                    value
                  }
                }
              }
            }
          }
        }
      }
    }
  }
}
! Specify NTP servers
{% for server in data.InfraDevice.edges[0].node.location.node.servers.edges %}
ntp server {{ server.node.name.value }}
{% endfor %}
{% if data.InfraDevice.edges[0].node.location.node.servers.edges|length > 0 %}
ntp enable
{% else %}
ntp disable
{% endif %}The GraphQL query uses a variable called device_name, which lets us dynamically fetch data for a specific device. When we run this query inside the Infrahub GraphQL Sandbox, we get structured output containing the device name, its location, and associated servers.
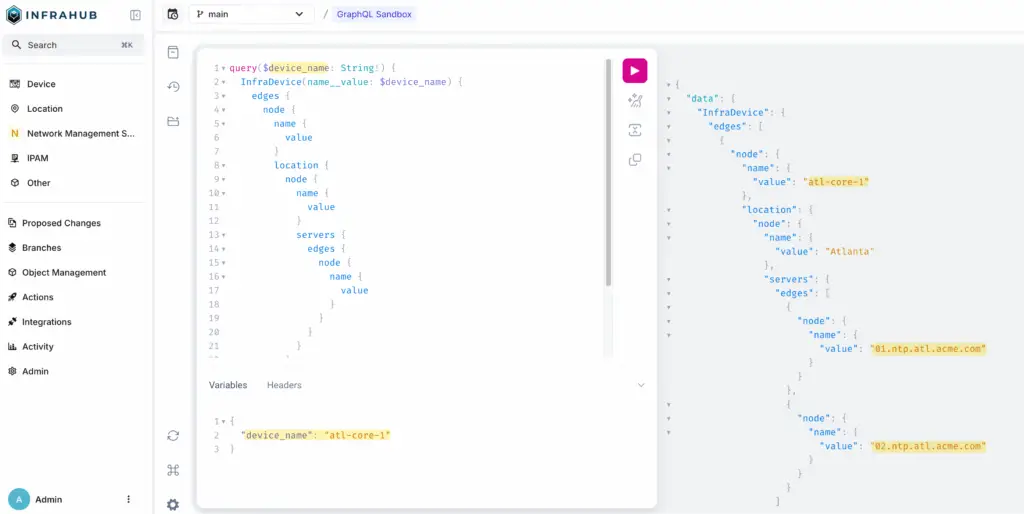
This data is then passed into the Jinja2 template to render a plain text configuration for the device. For example, it loops through the list of servers and renders them using ntp server . Based on whether any servers are found, the template either enables or disables NTP.
Please note that the ntp enable command might not be valid on Arista. The point of this example is not to reflect a real command but to demonstrate how we can handle scenarios where no NTP servers are defined for a location and adjust the output accordingly.
You can preview the rendered configuration directly from the CLI using infrahubctl. Just run the following command to render the config for a specific device.
infrahubctl render arista_ntp device_name=atl-core-2This will output the rendered text based on the template and the device data in Infrahub.
! Specify NTP servers
ntp server 01.ntp.atl.acme.com
ntp server 02.ntp.atl.acme.com
ntp enable
Why test with the pytest plugin for Infrahub
So far, everything works, and we have a rendered configuration. But you might wonder, why would we need testing?
To kick things off, let’s say someone else, or even you, comes in and makes a change to either the perfectly working GraphQL query or the Jinja2 Transformation.
How do we know those changes are free of syntax errors? Sure, if we send a bad query to Infrahub, we’ll likely see an error in response, but ideally, we want to catch these issues as early as possible, before they make it into production or cause unexpected failures.
Overview of the Infrahub pytest plugin
Infrahub allows users to define tests to ensure that Transformations and checks are working as intended. This can be an important step while writing Infrahub-related resources, as it makes sure they keep returning the same expected values over time and version bumps.
These tests are based on pytest but do not require users to write any Python code. Tests can be run via a command line and the pytest executable, but they’re also integrated in the CI pipelines of proposed changes in Infrahub.
Types of tests
The Infrahub test framework provides different types of tests to validate resources at different stages.
- Smoke tests validate that resources are defined appropriately. They make sure that resources can be parsed and they’re free of syntax errors
- Unit tests validate that resources can be rendered or run. They take input and output values as parameters to assert that rendering or running a resource will give an expected result for a known input.
- Integration tests validate that resources work as intended by testing them against a live Infrahub instance. We have integration tests under the
tests/integrationdirectory in the repository. We won’t cover them in this post, but we’ll look into covering them in an upcoming post.
Declaring tests
As mentioned, declaring tests doesn’t imply writing Python code. However, they do need to be defined in one or multiple YAML files. In a file, all tests must be listed under the infrahub_tests key.
Running smoke tests with pytest in Infrahub
Under the tests/smoke directory, we have a test file that defines two smoke tests.
The test types are graphql-query-smoke and jinja2-transform-smoke, which are used to check the syntax of the GraphQL query and the Jinja2 template. Each test points to its corresponding file inside the templates directory, ensuring that both resources are syntactically correct.
If you run the smoke tests using pytest tests/smoke/ command, you’ll see both tests pass successfully. Each dot in the output represents a test that passed. This confirms that both the GraphQL query and the Jinja2 template are free of syntax errors.

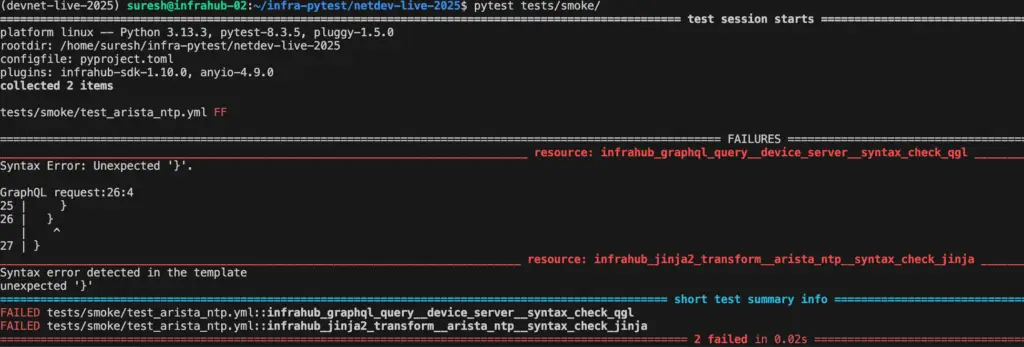
Now, if you go and introduce a syntax error like removing a curly brace or parenthesis from either the GraphQL query or the Jinja2 template and re-run the tests, you’ll see the test fail. This will be shown by an F in the output instead of a dot, indicating that the syntax check didn’t pass. The test result also shows exactly where the error is, as you can see below.
Validating templates with pytest unit tests
In the next section, we’ll look at how to write unit tests for Jinja2 Transformations using the Infrahub test framework (located under tests/unit). These tests help ensure that a given input produces the expected output when rendered with the Jinja2 template.
.
├── baseline
│ ├── input.json
│ └── output.txt
├── no_server
│ ├── input.json
│ └── output.txt
└── test_arista_ntp.yml
2 directories, 5 files
test_arista_ntp.yml
---
version: "1.0"
infrahub_tests:
  - resource: Jinja2Transform
    resource_name: "arista_ntp"
    tests:
      - name: "baseline"
        expect: PASS
        spec:
          kind: "jinja2-transform-unit-render"
          directory: baseline
      - name: "no_server"
        expect: PASS
        spec:
          kind: "jinja2-transform-unit-render"
          directory: no_server
In our example, we have two test cases. The first one uses input data where NTP servers are defined, and we expect the configuration to include those servers along with the ntp enable line.
tests/unit/baseline/input.json
{
    "data": {
      "InfraDevice": {
        "edges": [
          {
            "node": {
              "name": {
                "value": "atl-core-2"
              },
              "location": {
                "node": {
                  "name": {
                    "value": "Atlanta"
                  },
                  "servers": {
                    "edges": [
                      {
                        "node": {
                          "name": {
                            "value": "01.ntp.atl.acme.com"
                          }
                        }
                      },
                      {
                        "node": {
                          "name": {
                            "value": "02.ntp.atl.acme.com"
                          }
                        }
                      }
                    ]
                  }
                }
              }
            }
          }
        ]
      }
    }
  }
tests/unit/baseline/output.txt
! Specify NTP servers
ntp server 01.ntp.atl.acme.com
ntp server 02.ntp.atl.acme.com
ntp enable
The second case has no NTP servers, and we expect the rendered output to include only a comment and the ntp disable line. These tests validate not only the template logic but also help catch regressions if the template is modified later.
tests/unit/no_server/input.json
{
    "data": {
      "InfraDevice": {
        "edges": [
          {
            "node": {
              "name": {
                "value": "atl-core-2"
              },
              "location": {
                "node": {
                  "name": {
                    "value": "Atlanta"
                  },
                  "servers": {
                    "edges": [
                    ]
                  }
                }
              }
            }
          }
        ]
      }
    }
  }
tests/unit/no_server/output.txt
! Specify NTP servers
ntp disable
The point of these tests is to make sure our Jinja2 template behaves as expected. When servers are present, it should render them correctly and enable NTP. When no servers are present, it should skip listing servers and disable NTP instead. This helps us catch mistakes early if the template, data structure, or schema changes.
Similar to the smoke tests, you can run the unit tests by using the command pytest tests/unit. This will execute the defined test cases and show whether the rendered output matches the expected result for each input scenario.
Infrahub Proposed Changes
An Infrahub Proposed Change is similar to a pull request in Git. It allows users to review and discuss changes between branches. Reviewers can leave comments, request changes, and approve the proposed change before merging. This process ensures that changes are thoroughly vetted before integration into the main branch.
Earlier in the post, we added the repository to Infrahub. With that in place, the typical workflow starts when you want to make a change. You would clone the repository, create a new branch, make your changes, and push that branch to your remote Git repository, whether that's GitHub, GitLab, or another platform.
Once the branch is pushed, Infrahub detects it and automatically creates a matching branch. At that point, you can head over to Infrahub to create a Proposed Change.
As soon as the Proposed Change is created, Infrahub runs the defined tests for you. If there are any issues—for example, a syntax error in the query—the tests will fail, and you’ll see those results directly in the Infrahub interface. This helps catch problems early before merging anything into the main branch.
To demonstrate this in action, I created a new branch called syntax_change, made a small edit by removing a closing parenthesis in the GraphQL file, committed the change, and pushed the branch to the remote repository.
git checkout -b syntax_update
git commit -m "updated syntax"
git push origin syntax_update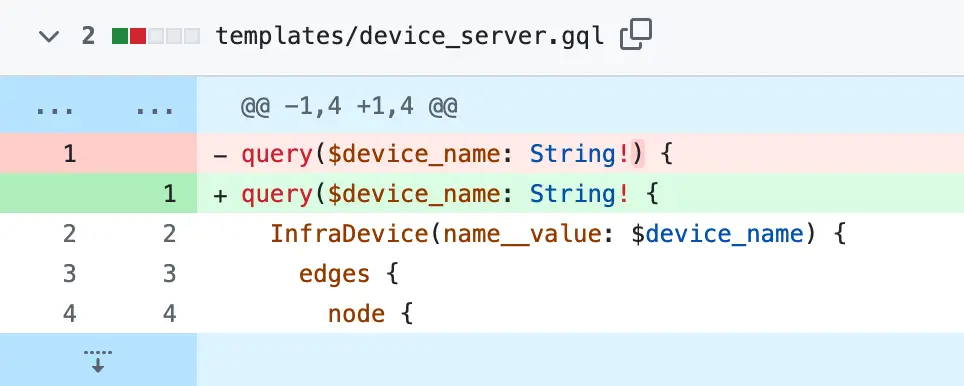
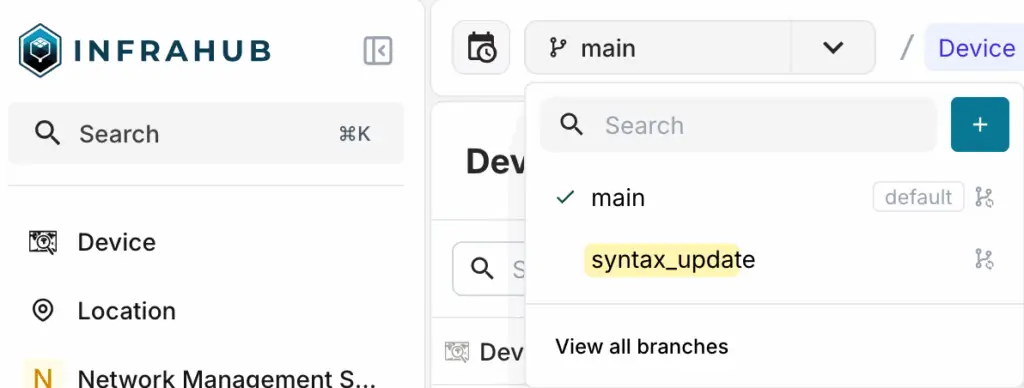
Since we already added this repository to Infrahub earlier, Infrahub automatically detects the new branch and creates a corresponding one internally.
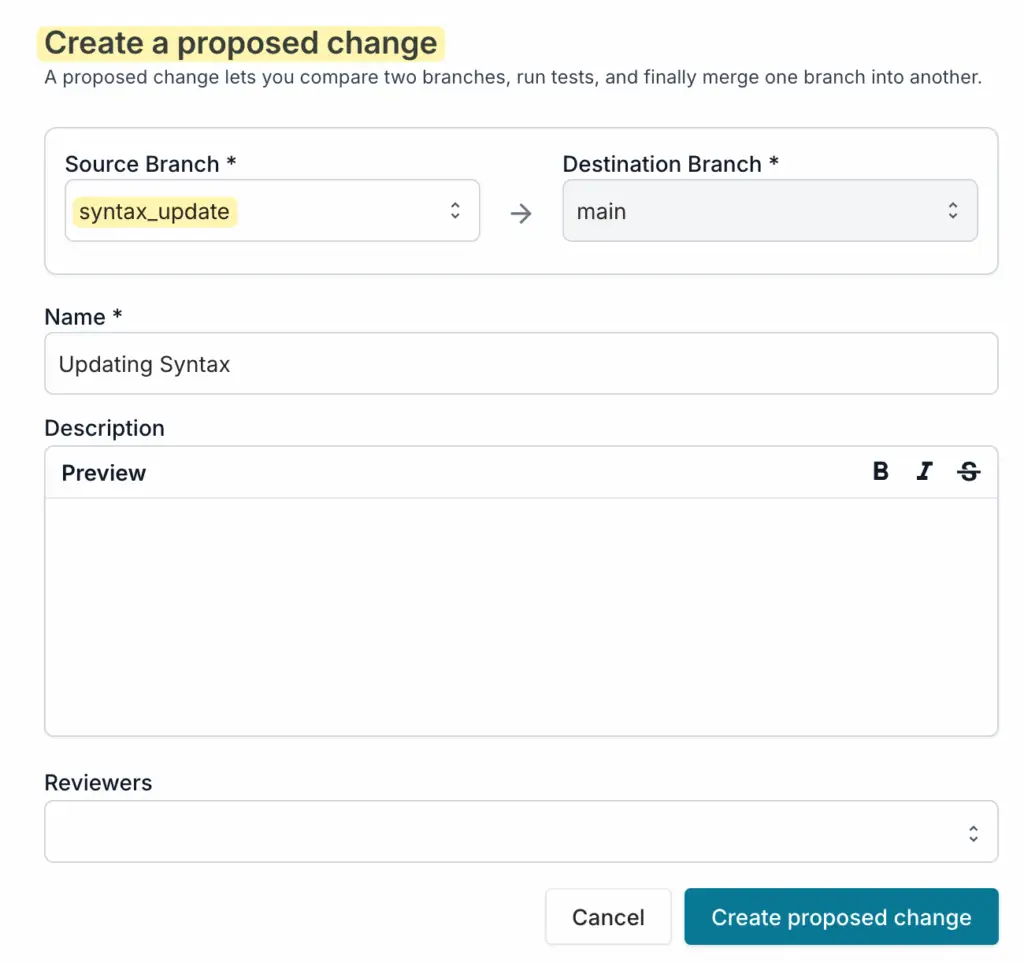
Next, inside Infrahub, we can create a new Proposed Change by selecting the new branch as the source and choosing the target branch to compare against, typically main.
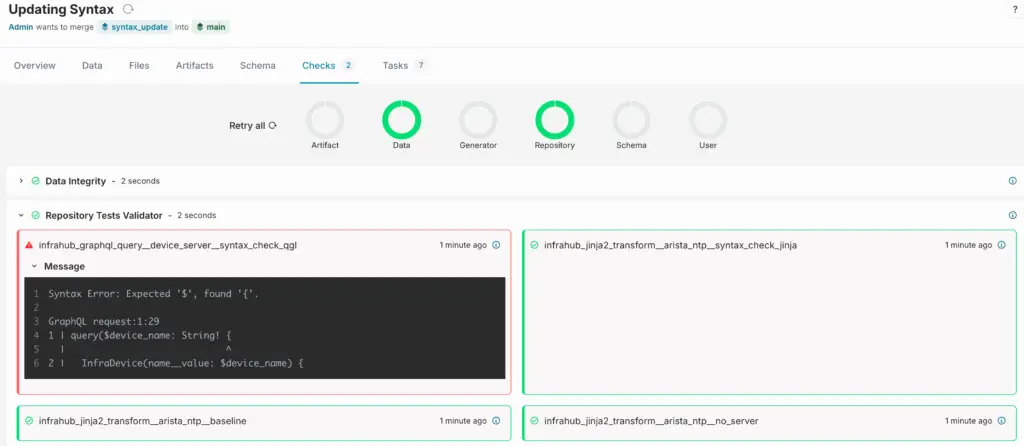
As soon as the Proposed Change is created, Infrahub automatically runs the associated tests. In this case, the GraphQL syntax test fails because of the missing parenthesis. This shows how the test framework helps us catch issues early during development, before the changes are merged.
Wrapping up
That wraps up our look at writing and running tests with the Infrahub pytest plugin. We covered how to validate GraphQL queries and Jinja2 templates using smoke and unit tests, and how those tests help catch issues early. We also looked at how Infrahub runs these tests automatically as part of the Proposed Changes feature.
In a future post, we’ll explore integration tests and how they fit into this workflow.
